Milk Chocolate and Hazelnut Petits Fours

With Christmas coming up, MasterChef Magazine has released a double issue. One of the things that I always get excited about in Christmas issues is their simple gift ideas.

One of Matt’s Tops 6 this month is Peter Gilmore’s Milk Chocolate and Hazelnut Petits Fours. These small morsels of delicious chocolate and hazelnut are the perfect gift for friends and family with a sweet tooth.


Milk Chocolate and Hazelnut Petits Fours

Ganache
300 grams milk chocolate finely chopped (I used Haighs)
125ml pouring cream
30 grams cold unsalted butter chopped

1. To make the ganache, place the milk chocolate in a large heatproof bowl. Place the cream in a saucepan and bring to almost boiling point. Pour the cream into the chocolate and mix until the chocolate has melted. Whisk the butter into the ganache until it is melted and the ganache is glossy. Cool in the fridge for at least a few hours.


Caramelised Hazelnuts
75 grams caster sugar
1 tablespoon pouring cream
60 grams roasted peeled hazelnuts
2 tablespoons water

You will need a sugar thermometer for the caramel.

1. Line a tray with baking paper. Place sugar and 2 tablespoons of water in a saucepan. Swirl until all the sugar is dissolved. Simmer until the caramel reaches 160c on a sugar thermometer. Stir in cream until well combined. Cook it for 30 seconds, make sure you watch this closely as it can split.

2. Remove the pan from the heat and add the hazelnuts. Make sure to stir until all the hazelnuts are coated with the caramel. Transfer the mixture onto the tray and allow to cool.

3. Working quickly using a fork and damp hands, pull apart the hazelnuts one at a time. Roll each nut between your fingers to form a ball of smooth caramel. Set aside until use.

White Chocolate Crumbs
100 grams white chocolate (I used Haighs)
100 grams organic palm sugar

1. Preheat the oven to 170c. Line an oven tray with baking paper and add the chopped chocolate to the tray. Bake for 12 minutes or until the chocolate is golden. Allow to cool.

2. Process the roasted white chocolate in the food processor. I wanted my white chocolate crumbs to be chunky so I used a toy hammer. I put the cooled chocolate into a zip lock bag and went to town. It’s a great way to take your anger out J. Put the white chocolate crumbs into a bowl and rub the palm sugar in until its all combined. Set aside to cool ion the fridge.


Assembling Petits Fours

1. Line a large tray with baking paper. Scoop teaspoons of ganache onto the tray. You should be able to get around 60. Refrigerate for at least 2 hours .

2. To assemble, push a caramel hazelnut into each ganache centre and form a ball. When you do all 60, put them back into the fridge to cool for a minute or 2.

3. Put the white chocolate crumbs into a deep bowl. Take the ganache out of the fridge and immediately coat each one into the chocolate crumbs. Cool the Petits Fours in the fridge until you are ready to serve.


These Petits Fours are a little time consuming but extremely worth it at the end. If you want to mix things up, try adding crushed chocolate covered coffee beans with the chocolate crumbs instead of the palm sugar. It gives it texture and a completely different flavour.

Read more...

Kei's Kitchen

I first read about Kei’s Kitchen on Grab Your Fork. Kei along with her daughter Masako were also featured on Food Safari.

Last weekend, I finally got the chance to do a cooking class at Kei’s Kitchen. My cousin Queenie and I managed to secure a spot in her Party Menu Class, which was her second last class for 2010.

Our Party Menu included a Snapper Cooked in a Salt Oven, Wagyu Tataki, Herbed Cured Ocean Trout and Barazushi.

The Snapper Cooked in a Salt Oven was delicious. We put hard boiled eggs in the stomach to keep its shape while it cooks in the salt crust. This dish is very quick to prepare and would be a great addition to a Christmas menu for a big family.


The Wagyu Tataki was so simple to make. This was served on top of some Shiso leaves (Japanese Basil). Kei also told us that this is an antibiotic that is very good for you. This is always served with Sushi in Japan.


The Herbed Cured Ocean Trout was served with light dressing and some spring roll wrapper that have been sliced into ribbons and deep fried. The crunchy spring roll wrappers added some texture to this dish.


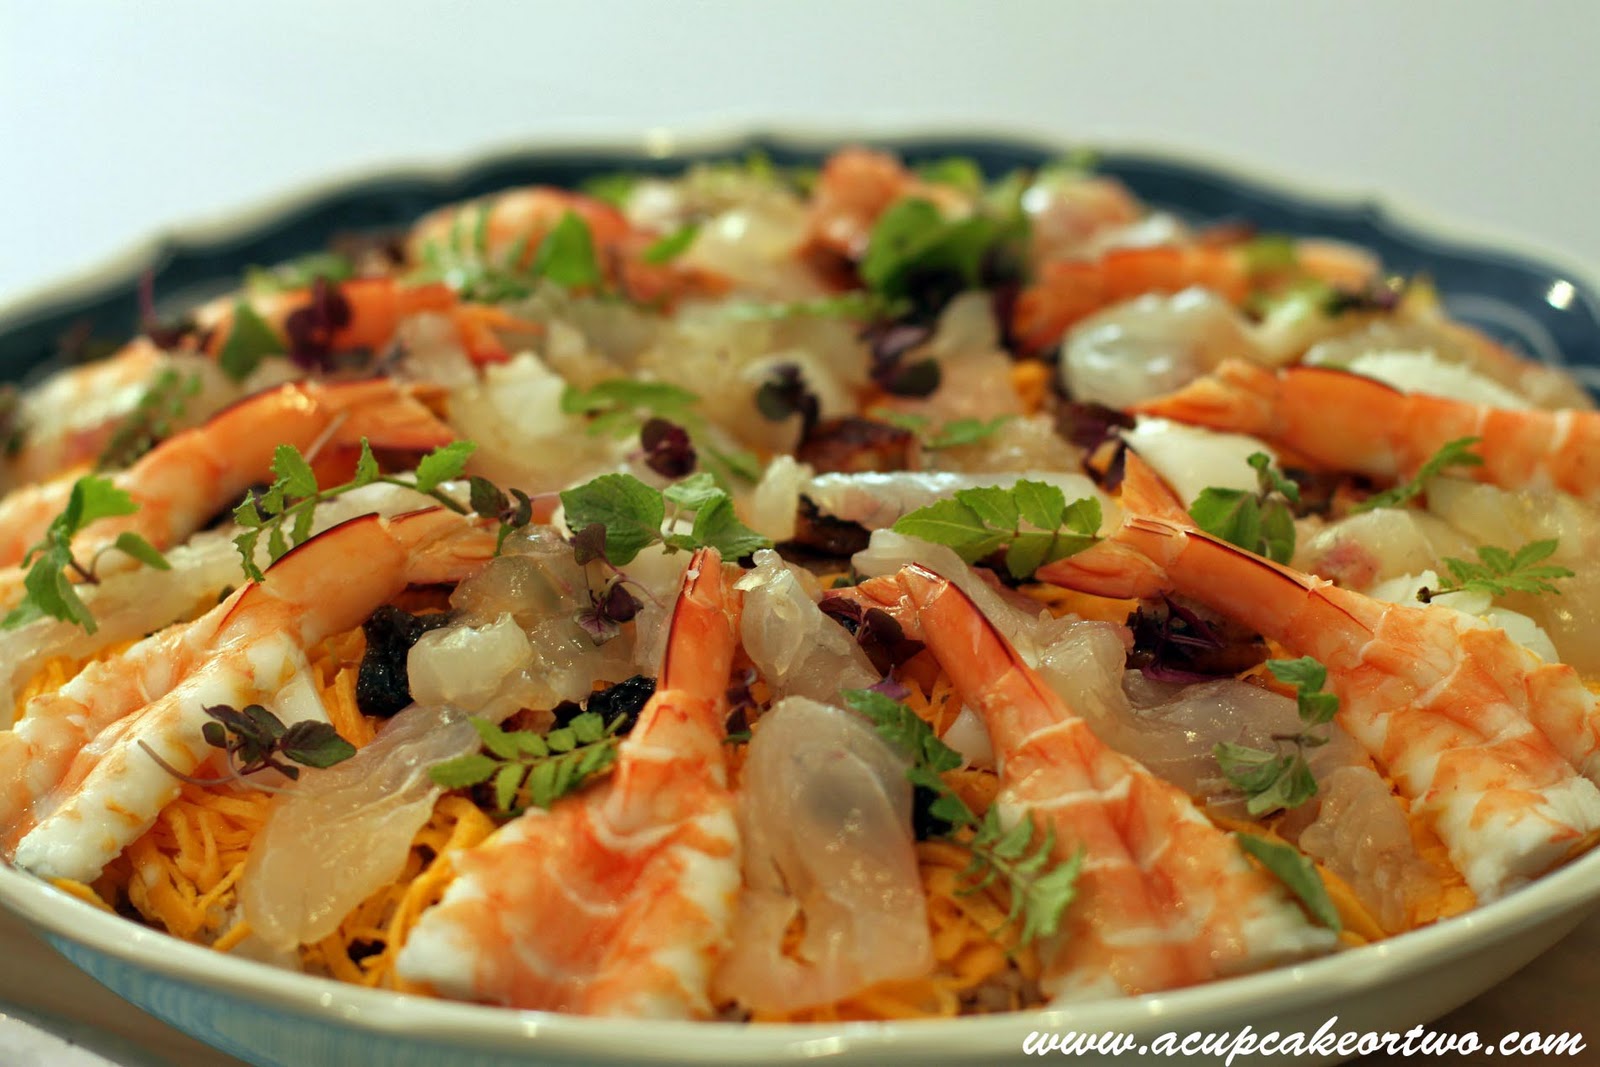
The Barazushi was delicious. It was basically a big bowl of sushi rice topped with egg threads, eel, prawns, snapper and garnished with beautiful shiso buds and kinome sprigs which smell beautiful.


We also prepared a medley of small dishes, which include Deep Fried Marinated Octopus, Seafood in Kimizu and Spinach Dressed in Sesame.


The next 4 hours were filled with making marinades, chopping, and preparing parts of dishes for their presentation. At the end of the class we all gathered around the table and enjoyed a meal together.


Kei and Masako taught us all about presentation and how important it is for the Japanese to prepare food that is only available at certain times of the year. I learnt a lot from Kei's class and I am already planning to book a class in 2011. If you would like more information about Kei's Kitchen you can visit their website www.keiskitchen.com.au

The Party Menu Class was $150.00 which is well worth it. This is a perfect Christmas gift for a foodie or someone who loves Japanese food.

Read more...

The New Look A Cupcake Or Two and a Giveaway

Thanks to Lindsay Nicole Design Studio, A Cupcake Or Two has had a makeover. I have been planning to do this for so long and a few weeks of holiday time has given me the opportunity to sit down and think about what I really wanted to do with my blog. So I hope you all like it.


To celebrate the new look, my first year of blogging and my passed 100th post I am doing a giveaway.

Thanks to Ross from Rice Cube, 8 A Cupcake Or Two readers have the opportunity to win their very own Rice Cube. 


The Rice Cube is a great little gadget that helps foodies with their presentation skills. It will certainly impress a big crowd. Its easy to use and a great present for this Christmas.

To be in the running for 1 of 8 Rice Cubes, all you need to do is leave a comment to tell me what you would make with your very own Rice Cube. Please include your email address with your entry. 


You can enter once a day, however only 1 prize per person will be awarded. The winners will be chosen based on the best/original answer.

Prize

1 of 8 Rice Cubes valued at $39.95 each inc GST

The competition is opened to all A Cupcake Or Two readers. This competition starts on the 3rd of November 12:00pm (AEST) and ends midnight on the 27th of November 2010 (AEST).

Good Luck Everyone....


THIS COMPETITION IS NOW CLOSED. WINNERS WILL BE ANNOUNCED SHORTLY

Read more...

A Halloween Treat - Buko Pandan

Bwahahahhahaha. It’s Halloween once again and below is my idea of a goolishly delicious treat. It’s actually called (Buko Pandan) or as Trish called it Green Grass Jelly & Young Coconut Cream Salad.


This dessert is popular at all Filipino gatherings and like all Filipino desserts, it is really rich and sweet.


So here is Mama Eugenio’s version of Buko Pandan

Buko Pandan

Ingredients
2 cans of green grass jelly
2 cans of coconut gel (Nata De Coco)
1 can of sugar palm seed (Kaong)
600ml thickened cream
1 can of condensed milk
2 bags of frozen young coconut meat
1 teaspoon of pandan flavouring


Method

1. Drain the coconut gel, sugar palm seeds and coconut.
2. Slice the grass jelly into small cubes and put it into a large deep serving bowl.
3. Add the coconut gel, sugar palm seed and coconut to the grass jelly.
4. Stir in the thickened cream, condensed milk and pandan flavouring.
5. Set aside in the fridge to chill for at least 30 minutes before serving.


Tips:

-       - Once the Buko Pandan chills the flavour changes so buy 2 cans of condensed milk as you may need to add a little bit more. It really depends on how sweet you want it.
-       - If you cant find grass jelly, you can just make pandan flavoured jelly using agar agar, sugar and some pandan flavouring
-       - All the ingredients are available at all good Asian supermarkets.

Happy Halloween Everyone, I hope you all have a devilishly good time. Mwahahahahahha…

Read more...
Kulinarya - Suman

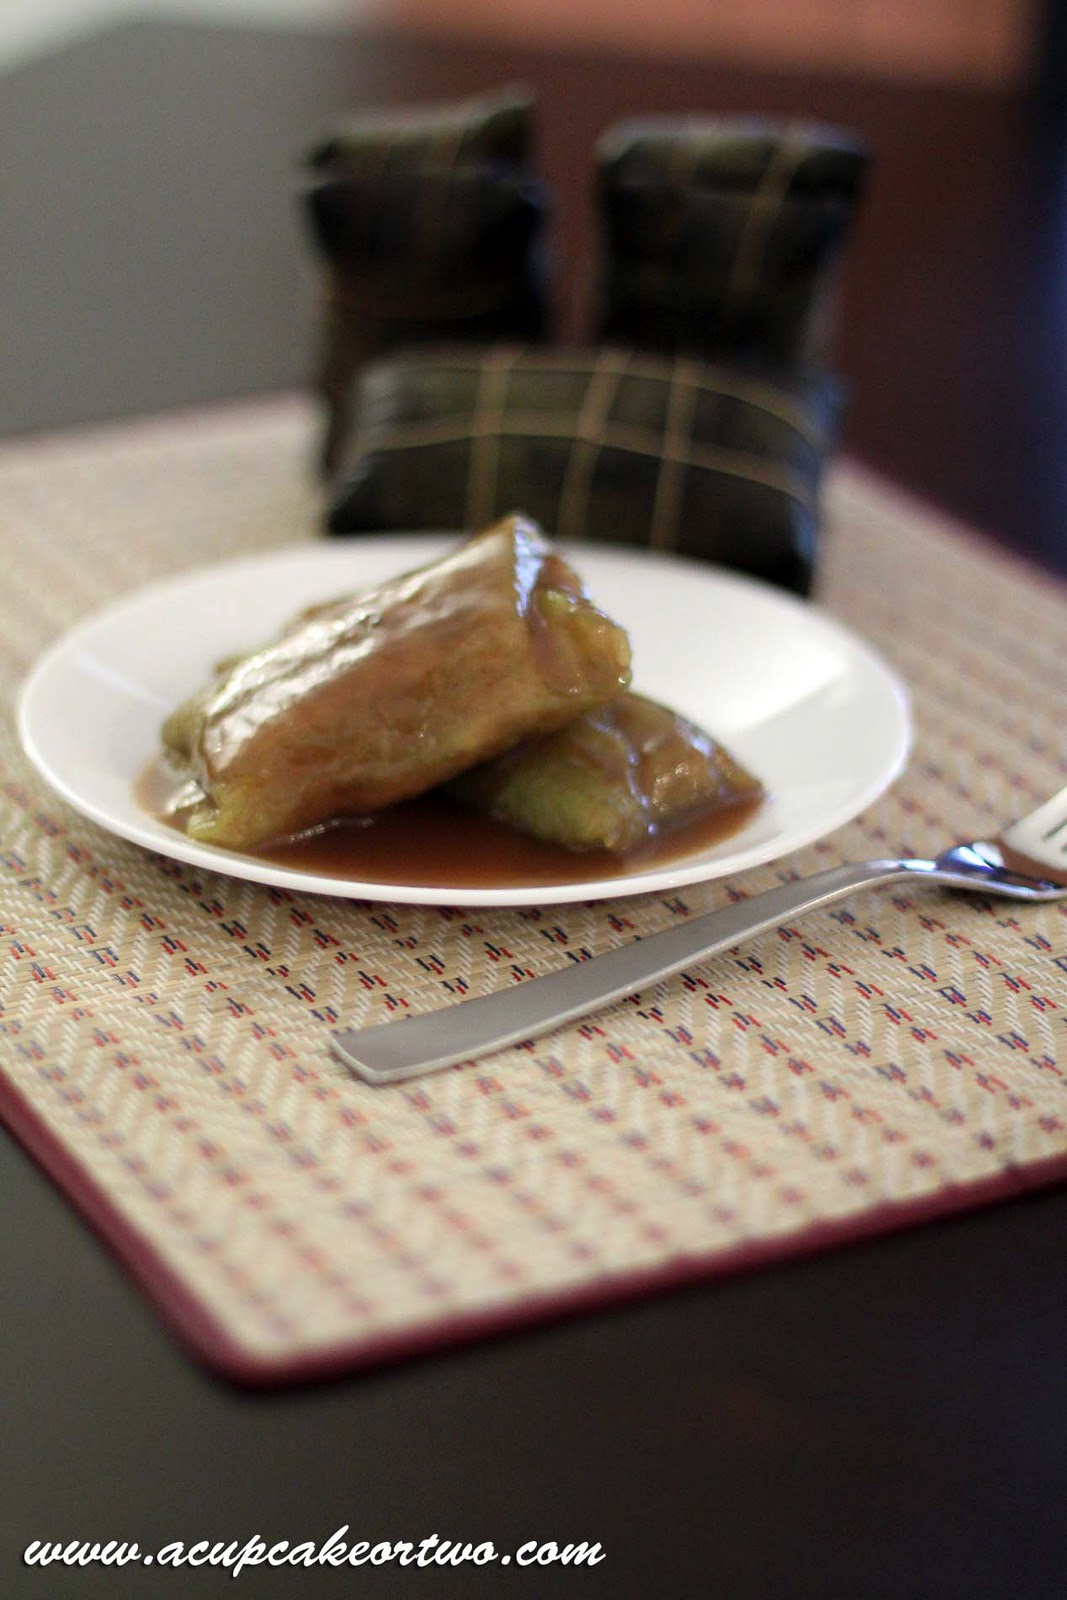
Thanks to Sheryl from Crispy Waffle and Divina from Sense & Serendipity the theme for October’s Kulinarya Cooking Club is Suman. This was a really challenging dessert for me to make. I remember watching my grandmother making it but never thought that I would one day make it myself.


I rang my Aunty Dulce and asked her to help me with this months challenge. We decided to make Suman sa Lihiya. So with my Grandmothers recipe in hand, we started the long process of making this delicious dessert.

Suman Sa Lihiya with Latik

1 kilo of Glutinous Rice
1 teaspoon of Lye Water
1 kilo of Banana Leaves
1 roll o kitchen twine

(You can find the Lye Water and the Banana Leaves at any Filipino Food Store)

The first thing that needs to be done is to prepare the banana leaves. Take the leaves and cut them into approximately 30cmx 30cm pieces. Wash the banana leaves and allow them to drain. Make sure they are still slightly damp. Turn on the stove top and pass the leaves on both sides. They will change colour from a light green to a dark green. This is done so that the leaves are more pliable. It ensures that you can wrap the suman mixture without the leaves falling apart.

1. Wash the glutinous rice a few times to get rid of the grit. Put the rice in a large bowl and add the lye water. Mix well.

2. Take one big spoon of the rice mixture and put it in the middle of the banana leaf. Take both ends of the leaf and bring it up. Fold both ends down and tuck the sides to form a small parcel.


3. Take 2 of the small parcels and put them on top of each other. Get some kitchen twine and wrap it around and tie a small knot on the side to secure.


4. Once all the suman is wrapped, put it all in a deep pot and cover with water. Boil the suman for two hours. After 2 hours take the suman off the heat and drain.

5. Set aside while you make the latik.


Latik Sauce

2 cans of coconut cream
1 to 1½ cups of brown sugar firmly packed

1. In a medium saucepan, combine the sugar and the coconut cream together.
2. Stir over medium heat until the sugar is dissolved. Let the mixture reduce until it is a thick consistency. Make sure to stir the mixture constantly to avoid sticking to the bottom of the saucepan.

To serve – Peel the banana leaves of 2 suman and serve with lots of latik on top.


Kulinarya Cooking Club was started by a group of Filipino foodies living in Sydney, who are passionate about the Filipino culture and its colourful cuisine.
Each month we will showcase a new dish along with their family recipes. By sharing these recipes, we hope you find the same passion and love for Filipino Food as we do.
If you’re interested in joining our Kulinarya Cooking Club, please feel free to drop by our foodblogs and leave a comment – we would love to hear from you!


Say hello to the other members of the Kulinarya Cooking Club!

Tressa
Connie Veneracion frm http://homecookingrocks.com/
Rochelle Ryan from http://www.whydiss.blogspot.com/

And of course… Trish from Sugarlace and Trissa of Trissalicious!


Read more...
Related Posts with Thumbnails