Pineapple and Coconut Slice

Mel from work introduced me to this gorgeous cake, when it was her turn for bake day. Bake Day has become a bit a tradition at work. Every Wednesday, someone makes a sweet or savoury treat for everyone in bake club. This cake was a hit. It’s a moist and delicious cake that brings back those summer months. So here is the recipe for Pineapple and Coconut Slice.


Pineapple and Coconut Slice (recipe from the Women’s Weekly)

Ingredients

185 grams butter
¾ cup (185g) caster sugar
3 eggs
2/3 cup (50g) desiccated coconut
1¾ cups (260g) self-raising flour
270ml can coconut cream
440 grams crushed pineapple (well drained)
1/3 cup (25g) shredded coconut

Method

1. Preheat the over to 180C (160C fan-forced). Grease a 22cm x 32cm rectangular cake pan: line base and sides with baking paper, extending paper 5cm over edges.

2. Beat butter and sugar in a small bowl until light and fluffy. Beat in eggs one at a time. Transfer the mixture into a large bowl.

3. Stir in coconut, sifted flour, coconut cream and pineapple in two batches.

4. Spread the mixture into the pan and bake for 45 minutes or until a skewer comes out clean.

5. Stand in a cooling rack for 10 minutes before icing.


Lime Glace Icing


Ingredients

1½ cups (240g) icing sugar
20 grams butter (melted)
2 tablespoons lime juice (approximately)

Method

1. Sift icing sugar into a small heat proof bowl, stir in butter and enough lime juice to make a soft paste.

2. Stir over small saucepan of simmering water until the icing is spreadable.

3. Spread icing over the cake and sprinkle with coconut.


This is fantastic treat for coconut and pineapple lovers alike. This post is dedicated to my friend Hayley. She is a big fan of pineapples. She even had a pineapple plant named Pineapple Pete. Herms thanks for being such a wonderful and supportive friend. You always know how to cheer me up. You are truly one of a kind..

Read more...

Takoyaki Balls

When my parents asked me what I wanted from Japan, I told them that I wanted a Takoyaki Pan. My dad rang me a few times and told me that it wasn’t looking good. They went to every kitchen shop they could and it was either sold out or they didn’t sell it at all.


A few days before they left Japan he found the takoyaki pan around the corner from where they were staying. When I got the pan, I was so excited. I went online and found a few recipes and tips about making the takoyaki balls.

I went to Miracle Asian Supermarket in the city at lunch one day and bought everything that I needed to make the takoyaki balls. I’m the queen of shortcuts, so I was thrilled to find a packet of takoyaki mix. All I needed to do was add water and an egg.
I decided to make the takoyaki balls with prawns instead of octopus. So below is a super simple takoyaki recipe.


You will need a takoyaki pan. My parents bought mine from Japan but I am pretty sure it is available in some Asian supermarkets.

Takoyaki Balls

Ingredients
250 grams takoyaki mix
6 large king prawns peeled and chopped into bite size pieces
1 large egg
1 -2 cups of cold water
2 spring onions chopped (optional)
2 small packets of red pickled ginger finely sliced

Garnish
1 packet katsuobushi (bonito flakes)
Japanese mayonnaise
Takoyaki sauce or bulldog sauce
Method

1. In a bowl, lightly beat the egg with 1 cup of cold water.

2. Add the takoyaki mix to the bowl and mix until combined. Slowly add more cold water until the mixture is runny. Make sure you don’t over mix.

3. Heat the takoyaki pan and spray some cooking oil on each hole. Pour the mixture into each hole until it is 80% full.

4. Put a piece of prawn in each hole and top with spring onions and ginger.


5. After a few minutes of cooking take a BBQ stick and run it through the sides of each ball, making a square.

6. With the BBQ stick turn them over, about 90 degrees. Tuck the sides to form rounds.


7. Flip the takoyaki every few minutes until golden brown.


Serve the takoyaki balls by topping with some takoyaki sauce, Japanese mayonnaise and bonito flakes.


The takoyaki balls were delicious. It was crunchy on the outside and soft and fluffy on the inside. I will be making these again. Maybe with some practice I can start showing of my takoyaki making skills.

Read more...

Kulinarya - Polvoron

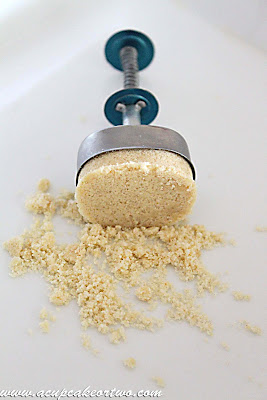
The Kulinary theme for April is Polvoron. Polvoron is a Filipino treat that is made out of toasted flour, milk powder, sugar and butter. It's extremely simple to make and very decadent. There are a lot of different polvoron flavours that you can make. A few of them being cookies and cream, pandan, pinipig, peanut brittle and chocolate covered polvoron.


I decided that I would stick to the original version of this ever popular Filipino treat. So below is Mama Eugenio's version of Polvoron.


Mama Eugenio's Polvoron
Ingredients
1 cup flour
2 cups powdered milk
3/4 cup sugar
125 grams unsalted butter (melted)


You will need to buy a Polvoron mould, this can be purchased at any Filipino store. If you cant find one a round or oblong cookie cutter should do the trick.


Method

1. In a wok, toast the flour until it's golden brown. You should be able to smell it toasting. Make sure to stir as you toast the flour, otherwise it will burn. Set aside to cool.

2. In another bowl, combine the powdered milk, sugar and toasted flour. Mix the dry ingredients together until it is well combined. (some recipes tell you to sift the dry ingredients, but Mama Eugenio said there is no need)

3. Make a well in the dry ingredients and slowly pour half of the melted butter into the mix. Stir until combined and slowly add the rest of the butter until it resembles wet sand.

4. Use the polvoron mould to shapre the mixture. Cool in the fridge for about 10 minutes before individually wrapping them in coloured tissue paper.


I didnt have any tissue paper so I just put them on a plate for all to share. They were gone in a day.


Kulinarya was started by a group of Filipino foodies living in Sydney, who are passionate about the Filipino culture and its colourful cuisine. Each month we will showcase a new dish along with their family recipes.

By sharing these recipes, we hope you find the same passion and love for Filipino Food as we do.
If you’re interested in joining our Kulinarya Cooking Club, please feel free to drop by our foodblogs and leave a comment – we would love to hear from you!
Joy - http://joyjoycreativeoutlet.blogspot.com/

And of course… Trissa of Trissalicious and Trisha from Sugarlace

Read more...

Food For The Gods

My cousin Rachel made a suggestion for me to make Food For The Gods. Food for the Gods is basically a Date and Walnut slice. It's rich like fruit cake and incredibly sweet. From what I have heard, they call it Food For The Gods because of the ingredients used. Dates and Walnuts can be very expensive in the Philippines.


The recipe below is adapted from http://pinoyfoodblog.com/

Food For The Gods
Ingredients

1 cup dates, sliced into small pieces
1/3 cup sultanas
1 cup walnuts (chopped)
1/2 cup of Brazil nuts (chopped)
1/3 cup butter
2 tablespoons molasses
1/4 cup brown sugar
4 tablespoons honey
2 eggs
1 cup plain flour
1/2 teaspoon cinnamon
1 teaspoon baking powder


Method

1. Preheat the oven to 180C
2. Put some parchment paper down on a lamington tray. Making sure that the bottom and the sides are lined.
3. Combine chopped dates and the nuts and set aside
4. Cream butter and sugar together until fluffy.
5. Add molasses and honey until it is well combined.
6. Add the eggs one at a time and continue beating.
7. Sift together flour, cinnamon and baking powder and add it to the creamed mixture.
8. Fold in dates and nuts and mix with a spatula. Try and knock as much air as possible from the mixture as this slice is suppose to be dense.
9. Bake for 20 to 25 minutes. (Bake only until a skewer inserted comes out with a moist crumb)


This is normally cut into squares and wrapped in pretty paper. I didn't have the time to do this so I just cut them into squares. They were delicious and best served with a hot cup of tea.

Read more...

Quick and Easy Banana Bread

I love bananas. They are just so versatile. Not to mention its a great source of energy. I made this banana bread from a recipe that I found in the Woman's Day Valentines issue. It's moist and delicious. Its also a lot cheaper than buying a slice of banana bread at the local cafe for $4.00 or more.


The recipe has sour cream, which I think brings out the flavour of the bananas even more. I also added some crushed walnuts to add a bit of crunch.


Recipe from the Woman's Day

Banana Bread
Ingredients

125 grams butter
3/4 cups brown sugar (firmly packed)
2 eggs (lightly beaten)
1 1/2 cups self raising flour
1 teaspoon bicarbonate of soda
1 cup very ripe mashed bananas (approximately 2 large bananas)
3/4 cup sour cream
1 tablespoon milk
1/2 cup crushed walnuts (this is optional)

Method

1. Preheat the oven to 180c. Lightly grease a 10x20cm loaf pan. Line the base and sides with baking paper.

2. In a large bowl, using an electric mixer, cream butter and sugar together until light and fluffy. Beat in eggs one at a time, beating well after each addition.

3. Sift flour and bicarb together. Fold the mashed banana, sour cream and 3/4 cup of the flour into the creamed mixture. Lightly fold in remaining flour and milk until it is well combined. (if you are using walnuts, it is best to mix the nuts in at this point. Leave some aside to sprinkle on top of the banana bread)

4. Pour into the prepared pan and bake for 55 to 60 minutes or until golden brown.


The banana bread is great sliced thick and toasted with some butter. This was a hit at work so I will be making this again soon.

Read more...
Related Posts with Thumbnails